Guide
How Long Does a 3D Print Take?
Long enough that you should start it before dinner, not after. Print time is decided by four things, and the machine's rated speed is the least important of them.
By Scooter M. · Published · Last reviewed
How this page is funded: the buy links below are affiliate links. If you buy through one we earn a commission, at no extra cost to you. It does not change the order of the picks or a word of what we say about them. Full disclosure.
Printers we claim to have tested: 0. Everyone in this category says they tested twenty machines. We have not tested any, and we would rather say so. What we did instead is on this page: the manufacturer’s own published specification for every pick, cited and dated; the arithmetic on what it costs to run, with the inputs shown; a live price rather than a remembered one; and a plain answer on who should skip each machine.
The short answer
Anything from twenty minutes to several days, and the slicer will tell you before you commit. Small desk objects are typically under an hour or two; a 3DBenchy is the classic reference at around an hour on a current machine; anything filling a 256 mm plate runs overnight. Print time scales with the volume of plastic, not with the size of the box it fits in.
This is the question people ask before they buy and again on their first evening, and the honest answer is that nobody can give you a number without seeing the model. What we can do is explain what drives the number, so you can predict it yourself and so the estimate in your slicer stops being a surprise.
The slicer already knows
Before anything else: every slicer gives you a time estimate the moment you slice a model, before you send it to the printer. It is usually accurate to within ten or fifteen percent, because it is simulating the actual toolpath rather than guessing.
That means the useful workflow is: download the model, slice it, read the estimate, and then decide whether to press print. If you are picking models from one of the model libraries, some listings publish the designer’s own print time, though it was measured on their machine with their settings and yours will differ.
The four things that actually decide it
1. How much plastic the object contains. This is the dominant factor and it is not the same as how big the object looks. A hollow vase and a solid cube of the same outer dimensions differ by an order of magnitude in time, because the printer is drawing every layer of the solid one all the way across.
2. Layer height. The printer lays down one layer at a time, so halving the layer height roughly doubles the number of layers and therefore the time. A 0.2 mm layer is the sensible default; 0.3 mm is noticeably faster and slightly rougher; 0.12 mm is for models where the surface is the point, and it will take most of a day on anything large.
3. Infill. The internal lattice that supports the top surfaces. Most beginner models do not need more than 15 percent, and the difference between 15 and 40 percent on a chunky model is hours. Raise it for functional parts that carry load; leave it alone for anything decorative.
4. Supports. Overhanging geometry needs scaffolding that gets printed and then thrown away, and it is printed at the same speed as the part. A model that needs heavy supports can easily spend a third of its time building plastic you will snap off and bin. Choosing models that avoid this is most of what easy first prints is about.
Why the rated speed on the box misleads
Manufacturers publish a maximum toolhead speed and it is the number that sells printers. Bambu Lab publishes 500 mm/s for the A1 series; Creality publishes 250 mm/s for the Ender-3 V3 SE and 500 mm/s for the KE; Elegoo publishes 500 mm/s for the Centauri Carbon and, unusually and to its credit, a recommended 250 mm/s on the same line.
None of those figures means the machine prints at that speed. They are straight-line ceilings. A real model is a continuous sequence of corners, and at every corner the head has to decelerate, turn and accelerate again. That is why acceleration figures matter more than top speed on small detailed models, and why a machine rated at twice the speed of another is not remotely twice as fast in practice.
The practical consequence: do not buy a faster printer to save time on your first year. Speed is the least important thing about a first machine, an argument we make at more length on the beginner roundup.
Published maximum toolhead speeds, read from each manufacturer's own page. These are ceilings, not print speeds.
| Machine | Published maximum | Manufacturer's own qualifier |
|---|---|---|
| Bambu Lab A1 mini | 500 mm/s | Published with a 10,000 mm/s2 acceleration figure |
| Creality Ender-3 V3 SE | 250 mm/s | Published with a 2,500 mm/s2 acceleration figure |
| Creality Ender-3 V3 KE | 500 mm/s | Same family, faster firmware |
| Elegoo Centauri Carbon | 500 mm/s | 250 mm/s stated as the recommended speed on the same line |
How to genuinely cut hours off a print
In order of how much time they save for how little quality they cost.
Raise the layer height. Going from 0.2 mm to 0.28 or 0.3 mm is the single biggest honest saving available, and on a functional part nobody will ever notice. Save the fine layers for the models where the surface is the point.
Drop the infill. If it is decorative, 10 to 15 percent is plenty. The temptation to print everything at 50 percent “to be safe” costs hours and grams for no benefit.
Orient the model to avoid supports. Rotating a part so its overhangs face upward frequently removes supports entirely. This is free, it improves the surface finish, and it is the skill that most separates a second-month printer from a first-week one.
Print fewer copies at once, not more. Counterintuitive and true on a single-nozzle machine: five objects on one plate take roughly five times as long as one, plus extra travel between them, and if the print fails at hour six you lose all five. Batch when the objects are small and the machine is reliable.
Is it safe to leave running?
The practical question behind “how long does it take,” because anything over about four hours means leaving the house or going to bed. Our honest position: current machines with automatic calibration, thermal runaway protection and power-loss recovery are designed for unattended printing, and most owners do it. That is not the same as a guarantee.
What we would actually do: run the first few prints of a new machine while you are in the building, put the printer somewhere with nothing flammable touching it, and treat a working smoke alarm in the same room as non-negotiable. Where the machine lives, and why that decision matters more than people think, is covered on where to put your 3D printer.
What a first evening actually looks like
Roughly ten to fifteen minutes from box to first print on a current auto-calibrating machine, and an evening on one that needs assembling. Then a sample model of twenty minutes to an hour. Then the useful thing you actually wanted, which is usually one to three hours.
Plan the first session around that rather than around a helmet. A list of models sized for exactly this, in the order that teaches the most per gram of filament, is on what to 3D print first.
What we would buy for this
Chosen from the same registry as our roundups, on the manufacturer’s own published figures and a live price.
Bambu Lab A1 mini
Bambu Lab · A genuine first printer
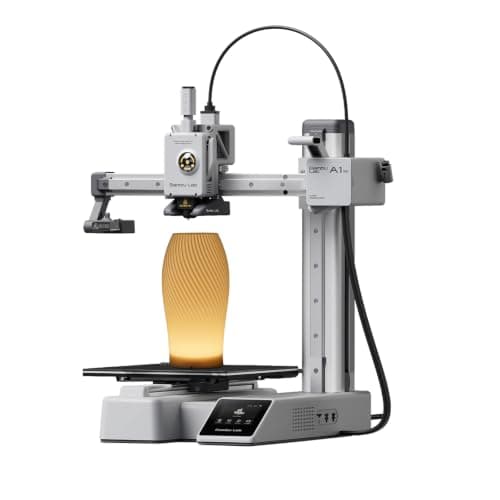
The one to get if you have never done this before. It calibrates itself before every print — bed mesh, Z-offset, flow, resonance — so the part of 3D printing that used to defeat beginners is a step you never see. The build volume is the price you pay.
#ad Price as of October 21, 2026, from Amazon. Prices change. How we make money.
What it actually is
A small open-frame filament printer. Filament is a 1.75 mm plastic string on a spool; the machine melts it and draws your object one layer at a time. Open-frame means there is no box around it, which is fine for PLA and a limitation for materials that warp.
What the manufacturer states
| Figure | Value | Source |
|---|---|---|
| Build volume | 180 x 180 x 180 mm | Bambu Lab A1 mini technical specifications |
| Max hot end temperature | 300 C | Bambu Lab A1 mini technical specifications |
| Max build plate temperature | 80 C | Bambu Lab A1 mini technical specifications |
| Max toolhead speed | 500 mm/s | Bambu Lab A1 mini technical specifications |
| Max toolhead acceleration | 10,000 mm/s2 | Bambu Lab A1 mini technical specifications |
| Filaments rated ideal | PLA, PETG, TPU, PVA | Bambu Lab A1 mini technical specifications |
| Filaments not recommended | ABS, ASA, PC, PA, PET, carbon/glass fiber reinforced | Bambu Lab A1 mini technical specifications |
| Machine dimensions | 347 x 315 x 365 mm | Bambu Lab A1 mini technical specifications |
| Net weight | 5.5 kg | Bambu Lab A1 mini technical specifications |
| Max power | 150 W | Bambu Lab A1 mini technical specifications |
Read from Bambu Lab, A1 mini technical specifications on 2026-09-01. Where a manufacturer does not publish a figure, there is no row for it here.
What is good about it
- Full auto-calibration on every print, per Bambu Lab's own specification — no paper-under-the-nozzle ritual
- Rated ideal for PLA, PETG, TPU and PVA, which covers everything a beginner should print in year one
- 150 W maximum power draw is the lowest of any printer on this site, so running cost is trivial
- 5.5 kg and 347 mm wide — it fits on a desk without rearranging the room
What is not
- 180 mm cubed is genuinely small. A full-size helmet or a large cosplay prop will not fit
- Bambu Lab rates ABS, ASA, PC and fiber-reinforced filaments as not recommended on this machine
- The multi-color AMS lite is a separate purchase, so the headline price is not the multi-color price
- Bambu Lab's own Amazon store lists this machine bundled with an LED lamp kit rather than on its own, so the price on our button is for that bundle. The bare printer is sold direct on Bambu Lab's store
- Open frame, so it is at the mercy of a draft from a window or an air conditioning vent
Skip this one if
Skip it if you already know the thing you want to print is bigger than a shoebox, or if you specifically want ABS or a carbon-fiber-filled filament. Bambu Lab itself lists those materials as not recommended here, and buying a machine you intend to use outside its rated envelope is how a first printer becomes a frustrating one.
What we cannot tell you
We have not printed on this machine. Long-term reliability, real-world noise in a quiet room, and how the textured plate holds up after a year are all things we cannot honestly report without owning one.
How it scored for a beginner
- Setup out of the box9.5
- Auto-calibration10.0
- First-layer forgiveness9.5
- Parts and filament availability9.0
- Running cost10.0
- Help when it goes wrong9.0
Beginner fit 9.2 / 10. That is our editorial read of how well this suits someone buying their first printer, taken off the published specifications — not a test result, and not a verdict on absolute quality. It is deliberately not marked up as a rating in this page’s structured data. How we pick.
Elegoo Centauri Carbon
Elegoo · An enclosed printer without an enclosed-printer budget
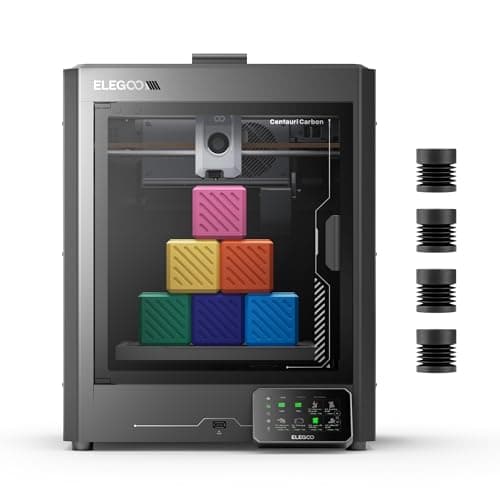
An enclosed CoreXY printer at a price that used to buy an open frame. If the reason you are hesitating about a beginner machine is that you can already see yourself outgrowing it, this is the one that answers that.
#ad Price as of October 21, 2026, from Amazon. Prices change. How we make money.
What it actually is
A boxed CoreXY machine with a steel chassis and aluminum and glass panels. The enclosure holds chamber heat, which is what lets it handle materials that shrink and peel on an open frame.
What the manufacturer states
| Figure | Value | Source |
|---|---|---|
| Build volume | 256 x 256 x 256 mm | Elegoo Centauri Carbon product specifications |
| Motion system | CoreXY | Elegoo Centauri Carbon product specifications |
| Enclosure | Fully enclosed; steel chassis with aluminum and glass shell | Elegoo Centauri Carbon product specifications |
| Maximum speed | 500 mm/s | Elegoo Centauri Carbon product specifications |
| Maximum acceleration | 20,000 mm/s2 (10,000 mm/s2 default) | Elegoo Centauri Carbon product specifications |
| Max nozzle temperature | 320 C | Elegoo Centauri Carbon product specifications |
| Max heated bed temperature | 110 C at 25 C ambient | Elegoo Centauri Carbon product specifications |
| Supported filament | PLA, PETG, ABS, ASA, TPU, PET, PC, PA and carbon or glass fiber reinforced grades | Elegoo Centauri Carbon product specifications |
| Bed leveling | 121-point auto-leveling; full-auto calibration | Elegoo Centauri Carbon product specifications |
| Print accuracy | +/- 0.1 mm | Elegoo Centauri Carbon product specifications |
| Machine size and weight | 398 x 404 x 490 mm, 17.5 kg | Elegoo Centauri Carbon product specifications |
| Rated power | 350 W at 110 V | Elegoo Centauri Carbon product specifications |
| Operating sound | 55 dB or below | Elegoo Centauri Carbon product specifications |
Read from Elegoo, Centauri Carbon product page on 2026-09-06. Where a manufacturer does not publish a figure, there is no row for it here.
What is good about it
- Fully enclosed at a price that competes with open-frame machines
- 20,000 mm/s2 rated acceleration, matching the enclosed Bambu
- 256 mm cubed — the same working envelope as an A1 or a P1S
- The enclosure contains noise and smell, which decides whether a printer can live in a bedroom
What is not
- A newer platform than the Bambu and Creality lines, so there is less community troubleshooting behind it
- An enclosure adds a heat-soak wait to PLA prints in a warm room
- Larger and heavier than any open-frame machine here
- Nothing about the enclosure makes the first print easier — it makes later prints possible
Skip this one if
Skip it if PLA is all you will ever print and your printer lives in a spare room. You are paying for a box you will not use. The enclosure earns its money on ABS, ASA and a shared living space, not on PLA in a garage.
What we cannot tell you
We have not printed on this machine. Chamber temperature in practice, panel fit and finish, and long-term CoreXY belt tension are not published numbers.
How it scored for a beginner
- Setup out of the box8.5
- Auto-calibration8.5
- First-layer forgiveness8.5
- Parts and filament availability7.5
- Running cost8.0
- Help when it goes wrong7.5
Beginner fit 8.3 / 10. That is our editorial read of how well this suits someone buying their first printer, taken off the published specifications — not a test result, and not a verdict on absolute quality. It is deliberately not marked up as a rating in this page’s structured data. How we pick.
How these were picked
We have not printed on these machines and we do not pretend to have. What we did was read each manufacturer’s own specification page, take their stated build volume, temperatures and speeds, check that every pick genuinely fits the job in this page’s title, confirm it is still being sold, and pull a live price rather than a remembered one. Every figure names the source it came from, so you can check it yourself in about a minute.
How we pick sets out the full method, including what would change a ranking.
Questions people actually ask
+−How long does a small 3D print take?
Typically twenty minutes to two hours for a desk-sized object at a 0.2 mm layer height and modest infill. A 3DBenchy, the standard reference model, is around an hour on a current machine. Your slicer gives an estimate before you print and it is usually accurate to within ten or fifteen percent.
+−How long does a large 3D print take?
Anything filling a 256 mm plate runs overnight, and a full-size helmet printed in sections is measured in days rather than hours. Time scales with the volume of plastic in the model, not with its outer dimensions — a hollow shape can be far quicker than a small solid one.
+−Does a faster printer actually save much time?
Less than the numbers suggest. Published speeds are straight-line ceilings, and real models are a continuous sequence of corners where the head is accelerating and decelerating rather than cruising. A machine rated at twice the speed is not twice as fast on real geometry.
+−What is the fastest way to reduce print time?
Raise the layer height from 0.2 mm to about 0.28 or 0.3 mm. It is the single biggest honest saving and on a functional part nobody notices. After that, drop infill to 10-15 percent for decorative models and orient the part to avoid supports.
+−Can I leave a 3D print running overnight?
Most owners do, and current machines are designed for it with thermal protection and power-loss recovery. We would still run the first few prints of a new machine while you are in the building, keep anything flammable away from it, and make sure the room has a working smoke alarm.